Flamed Satsuma Peel Marmalade

Marmalade is amazing because it utilizes the entire fruit to harness an array of flavors and textures. It only made sense to give Satsumas a go when they showed up this season.

Searzall Charred Satsuma
As with all of my investigations, there's a twist (pun intended). I couldn't help but wonder if using the cocktail method of flaming the orange peel would enhance the flavor. The key was figuring out a way to capture the aromatics so squeezing the peel to ignite the citrus oil was out. The Searzall sitting on my counter was the obvious answer. I lit it up and torched the Satsuma whole. It smelled pretty awesome and knew that I was onto something.

Plump and Warm Satsuma Post Peel Torching
Fresh Satsumas are addictive because they're easy to peel, crazy sweet and seedless. When I bought them for this project, I ate so many that my tongue went numb. The aromatic zest and scant amount of pith brings down the bitterness that you'd expect in a traditional orange marmalade. The membranes are so delicate there's no need to separate them in a muslin bag to extract the pectin.

Sliced Satsuma and Ribbons of Charred Peels
After I torched the mandarin, I peeled off the skin. Then I sliced the orange, did up a chiffonade on the peels and put them into a medium sauce pan. I cut the sugar down to 1/3 what's called for in a standard marmalade. The intent was to highlight the flavors instead of drowning them out with sweetness. You end up with a refrigerator jam that can't be put up but that's ok.

Flamed Satsuma Peel Marmalade
After it was cooked down and cooled, I tasted it. The Satsumas shined with a toned down bitterness. There were also smoky & burnt notes that came through from the charred peel. The ribbons of zest didn't hold together as much as a traditional, but it still had plenty of texture contrast. It was everything I hoped it would be.

Now go forth and make marmalade with any citrus you enjoy eating fresh. There's also something to be said for using the flavorful parts that would otherwise be tossed. It harnesses an indescribable complexity that by default matches the fruit. Also, don't forget to char all the citrus or any fruit for that matter prior to making a fruit preserve. So many possibilities...


The Method
  • Start off with a marmalade recipe of your choice (Here's AB's)
  • Scale the recipe down to make 1 pint or whatever amount you can use up in a couple weeks
  • Cut the sugar content down to a third
  • Simmer until most of the water is driven out before you kick up the heat to get to temperature
  • Once it's cool, refrigerate
  • It should last for at least a couple weeks in the fridge

As always, let us know how this inspires you to keep the ideas bouncing.

Carbonated Posset Pudding

I was intrigued by a posset dessert that @verysmallanna posted a while back. I had no idea what it was until I did some research. It sounded wonderful so I convinced her to share the recipe with me and started experimenting.

Carbonated Riesling Vinegar Posset

What is a posset? In this case, it's a simple pudding made with just three ingredients: cream, sugar and lemon juice. The thickening is driven by the acidity of the citrus curdling the milk.

Carbonated Posset Foam on Top

Of course, I couldn't just do it straight up. I happened to be experimenting with carbonation at the time and wanted try a dense liquid. The posset was the perfect candidate. The variation didn't stop there. I replaced the citrus juice with a killer Minus 8 vinegar based on a previous success with vinegar sherbet. I settled on Dehydr8, a Riesling raisin vinegar. It was sure to shine through the richness.
 
Creamy Carbonated Posset Underneath

After I prepared the posset, it went into the whipping canister hot. I allowed it to cool to the touch uncovered. Then I double charged it and refrigerated overnight. The next day I discharged and opened the canister to taste that the posset successfully carbonated. The flavor and texture are best described as a delicious grape creamsicle float pudding. The Dehydr8 vinegar gave it character and depth beyond what any citrus juice could do. As an added bonus, there were two distinct layers consisting of a foam layer on top and carbonated pudding underneath. I was amazed by how the straightforward carbonation process created such a wonderful texture combination. After tasting, I couldn't help but think about the potential for applying this technique to all sorts of puddings and custards. So it begins...


The Needs
  • 1 pint whipping canister
  • 2 CO2 charges 
The Ingredients*
  • 200g heavy cream (not ultra pasteurized)
  • 50g sugar
  • 3T high quality vinegar
  • Pinch of salt
The Steps*
  • Add the cream, sugar and salt to a small pot
  • Bring to a boil while constantly whisking
  • Remove from heat
  • Whisk in vinegar
  • Immediately pour into the whipping canister
  • Wait until the canister is cool to the touch
  • Charge the posset and carefully swirl so the liquid doesn't contact the top. It's pretty thick and you want to prevent a blockage.
  • Repeat with a second charge
  • Refrigerate overnight
  • Discharge the canister upright. The posset is too thick to pass through the nozzle. There should only be gas releasing from the top.
 * The ingredient ratios and steps for making the posset base are from @verysmallanna.


As always, please share your experiments to keep the ideas bouncing.

Searzall the Sweets

I'm always inspired by new techniques to achieve delicious results. So when Dave Arnold of Cooking Issues posted a Kickstarter on the Searzall, I backed it immediately.

Searzall Flame On!

What is a Searzall? For industry folks, it's a torch attachment that diffuses the flame to eliminate off flavors, AKA torch taste. Primarily used to finish sous vide and low temperature cooked meats. For adventurous home cooks out there, an Eater article has described it as a hand-held broiler. All in all, it's portable intense heat on demand for searing anything to your heart's desire.

I didn't plan ahead when the unit arrived so there wasn't any meat ready for the treatment. Of course I couldn't wait to get it fired up. That left me thinking about what would benefit from applying crazy heat to? Sugar was the answer.

Searzall Candied Fennel
I happened to have some candied fennel kicking around. The caramelization added a level of complexity that was pleasant. It was good but not amazing.


Searzall Malted Milk Powdered Baby Corn
Inspired by elote and grilled corn, I dusted baby corn with malted milk powder. The seared malted milk powder was freaking delicious. Not to mention the roasted corn aroma.


Searzall Malted Milk Powdered Caramel Apple
After testing a caramel apple recipe, it got the malted milk powder treatment. Ridiculously good.


Caramelized Malted Milk Powered Gingerbread

With that method under my belt, it was waiting for a dessert application. Recently, I was coring out centers of cut gingerbread squares for filling and had the light bulb moment. The caramelized malted milk gingerbread nugget was born. It's a flavor and texture extravaganza. A description wouldn't do it justice. You'll have to wait until it's on the Mei Mei Street Kitchen menu again or buy a Searzall and try it yourself.


The Process
Warning: Before you use a Searzall, please be sure to read and follow all the instructions provided especially those relating to safety. It's a wonderful piece of equipment, but can be dangerous if used improperly.

  • Dust small rounds of cake with malted milk powder. In fact, this will likely work with anything that has a cake-like structure and anything with sugar in a dust or fine granule form.
  • Set up a wire cooling rack over a sheet pan on a surface that can handle the heat.
  • Set parchment paper on another sheet pan for the finished pieces.
  • Place one of the rounds on the wire rack on its side.
  • Light up the Searzall.
  • Move the head of the Searzall back and forth over the cake until the milk powder caramelizes. Bank on incinerating one or two to figure out the optimal height and duration of exposure.
  • Rotate the round and repeat the process until all sides are caramelized. You should use a spoon or tool to push the cake around so you don't burn your fingers like I did.
  • Place the round of cake on each end to finish the ends.
  • Place the finished piece on its side and allow it to cool. 
  • Cycle through the remaining pieces until you're done.
  • Suggest eating them with a fine drizzle of smoked dulce de leche on top.

Pre Searzall Malted Milk Powdered Gingerbread

Post Searzall Malted Milk Powdered Gingerbread

For more details on how the Searzall works, check out the Booker and Dax Lab YouTube channel. The Searzall has a ton of potential and I'm looking forward to seeing all the applications folks come up with.

As always, I hope this idea inspires you to create and keep the ideas bouncing.

Kojify All the Grains

Homemade koji has been on my list for a while. It was serendipitous when @geofflukas asked me to figure out the process for his fermentation focused brunch.

What is koji? It's the Japanese term for the mold Aspergillus oryzae. Scratching the surface, koji is used to ferment soy beans for soy sauce and miso. It also has the power to convert rice carbohydrates to sugars for sake. I encourage you to research and discover all the delicious products that are based on koji. You'll be amazed.

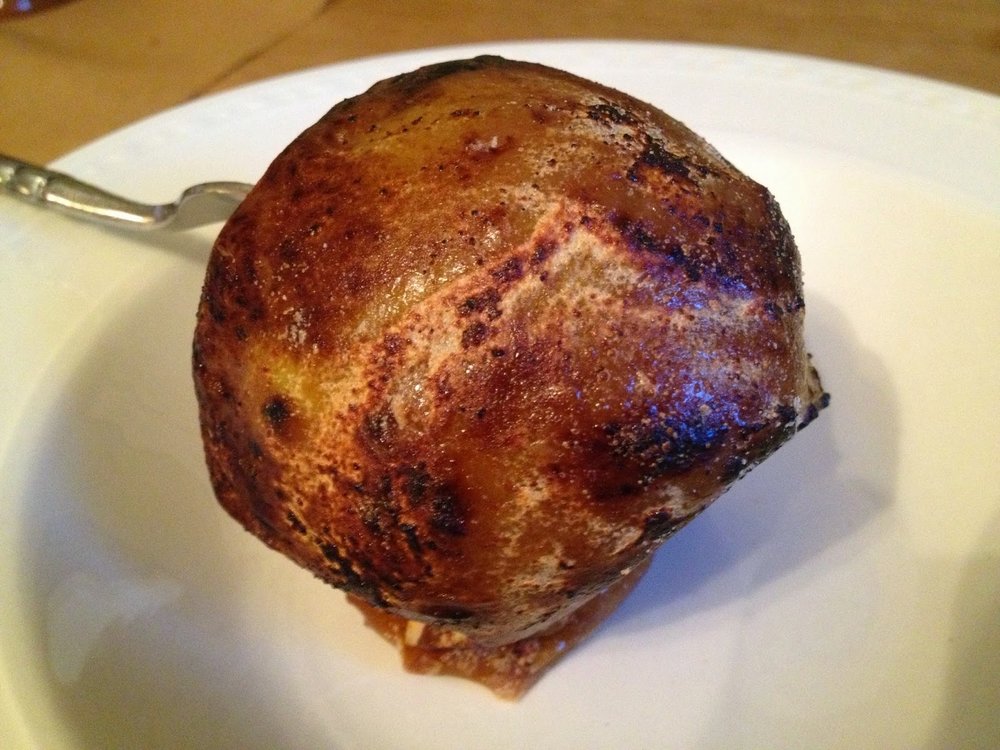
Popcorn Koji, Not a Blurry Pic
Searching for DIY options, I discovered @fermup's incubator to make koji and tempeh. I got in contact with @brandenbyers who generously provided everything I needed to make A. oryzae flourish. His help was key to my success.

The incubator only consists of four components: large cooler, aquarium heater, aquarium bubbler and 2" hotel pan (standard stainless steel tray that restaurants use). It is dead simple to put together and requires no customization. Then all you have to do is fill it with water, turn it on, set your hotel pan filled with grain/legume mixed with koji starter on the top, cover and wait.

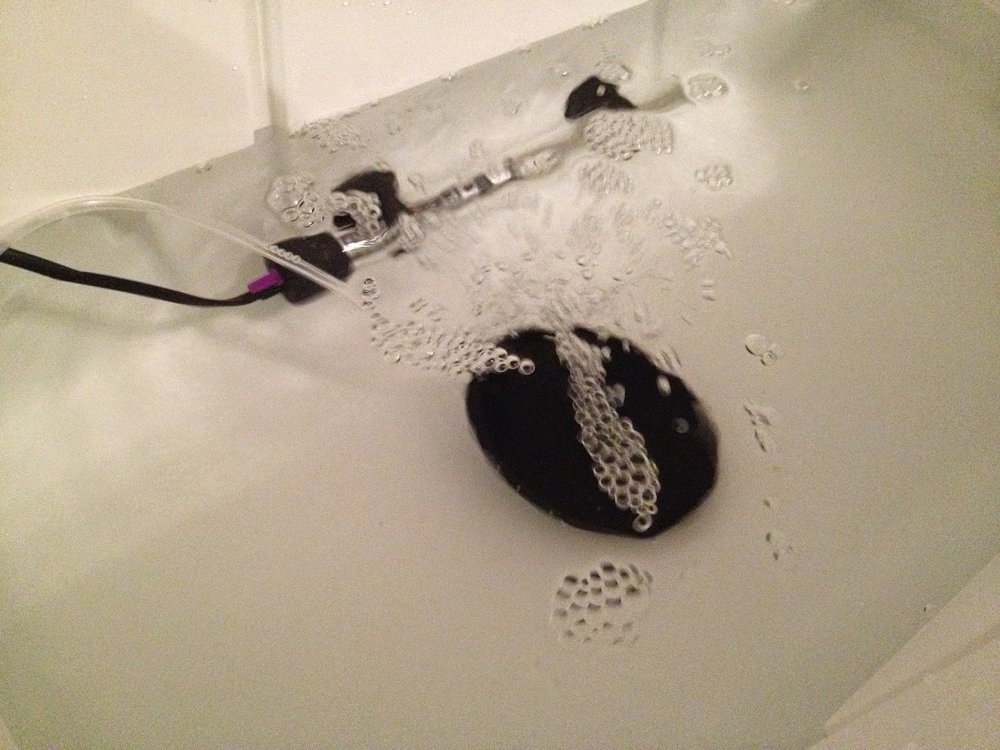
Incubator Rig in Action
The incubator performs extremely well based on two important factors. The cooler's insulated environment allows for the temperature and high humidity to be easily maintained. The water bath at the bottom of the cooler provides heat capacity to keep the temperature rock solid as well as a reservoir for the humidity.

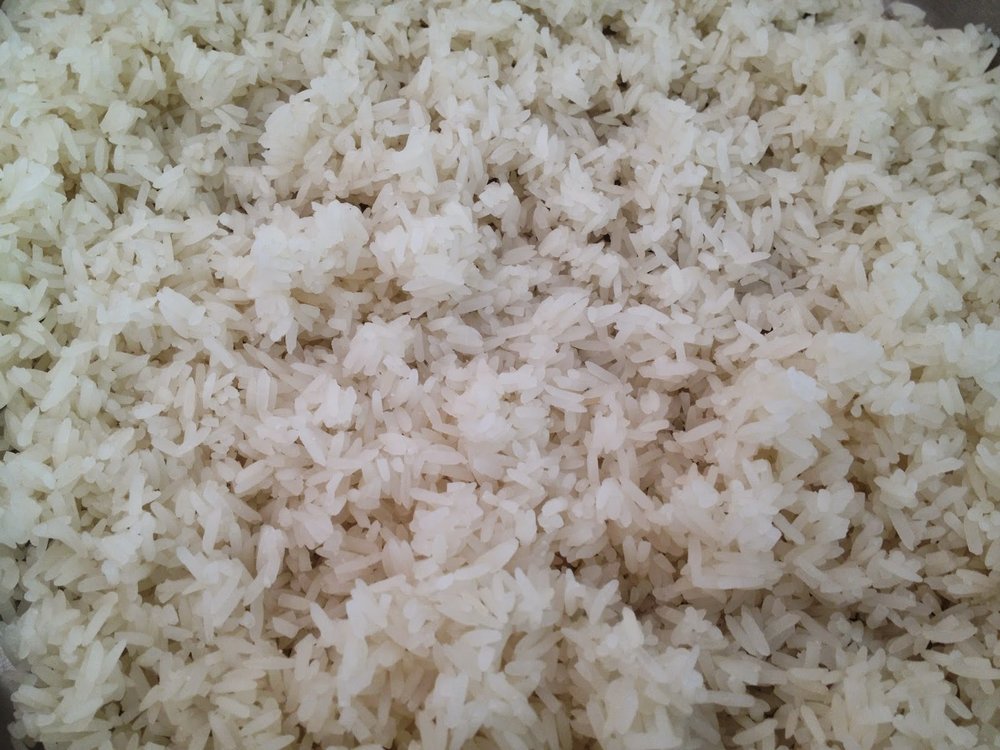
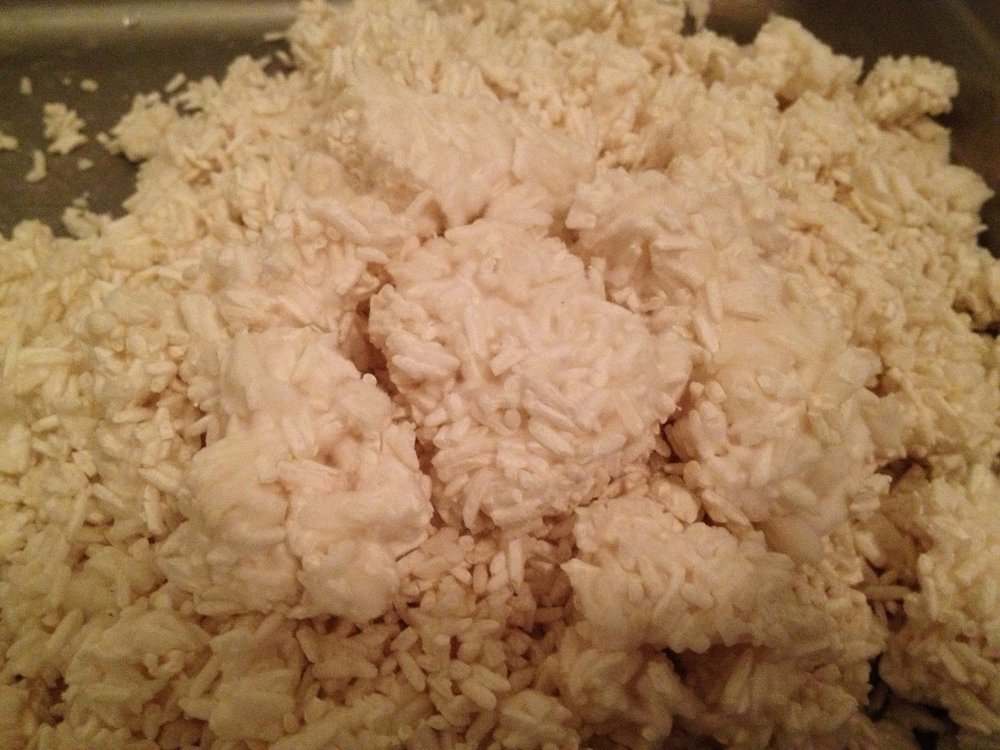
Thai Jasmine Rice with Koji Starter
Aside from tight controls on the environment, maximizing surface area is paramount for mold development. Prior to inoculation, the grains are "under cooked" so they remain separate and don't stick together. Long grain Thai Jasmine rice fit the bill.

Thai Jasmine Rice Koji
When the koji is done, you'll see a layer of white, fuzzy mold on top of the rice as seen in the clumps in the picture above. In my excitement, I didn't snap a shot until after I started breaking it up. The finished Jasmine koji smells and tastes amazing. Sweet and delicate. It was an excellent rice choice for the first run due to its high amylose content. Perfect for horchata.

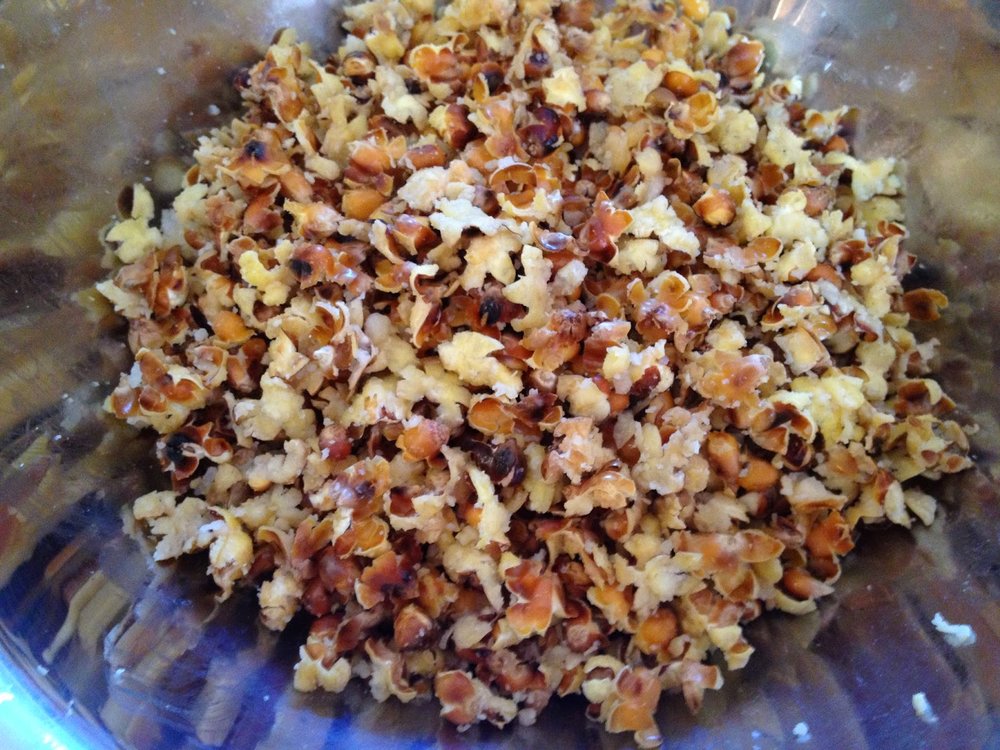
Wetted Down Popcorn with Koji Starter
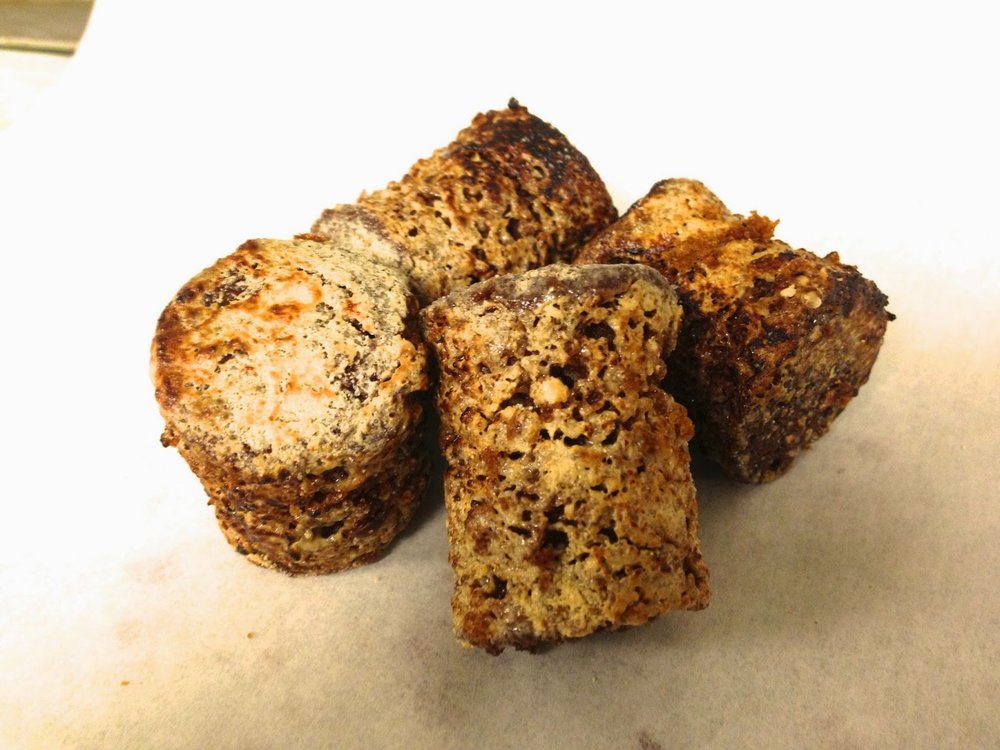
I went through my pantry to find a grain that maximized surface area for the koji to eat. Popcorn kernels were at eye level staring me down. Tons of accessible starch and maintains a great deal of separation, a perfect medium. The only minor issue was moisture content which was easily solved by adding a touch of water to wilt the popcorn.
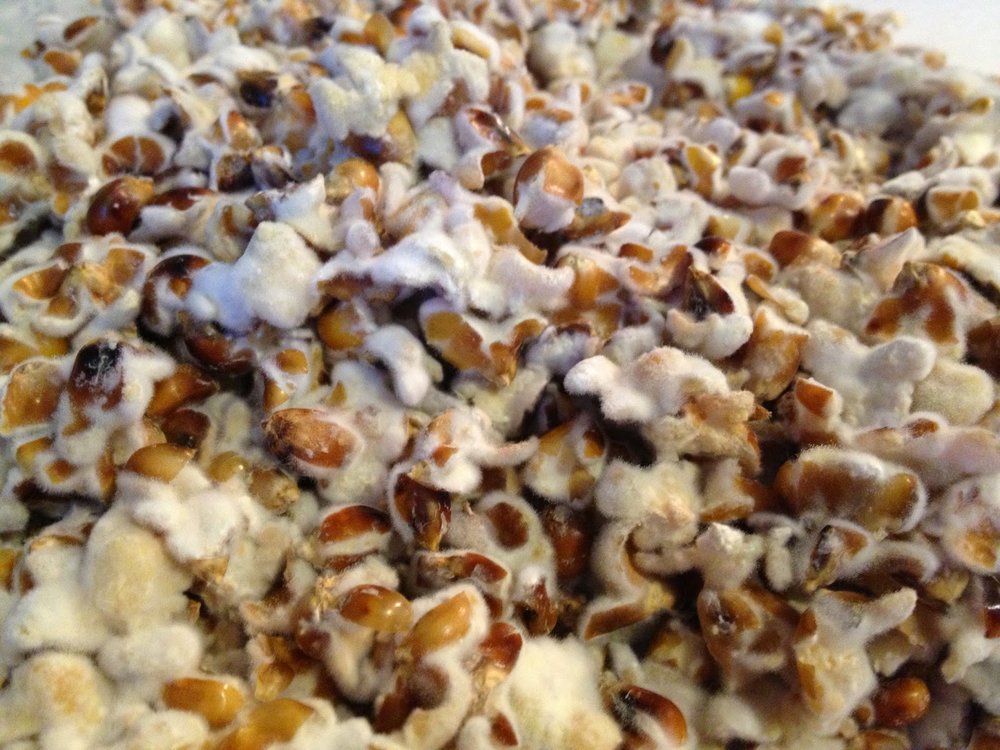
Fuzzy Popcorn Koji
The koji thrived on the popcorn! The result was koji forward and not nearly as sweet as the Jasmine. Now I have to figure out what to do with it aside from eating it straight up.

On the next run, I decided upon steel cut oats because I was looking for a new breakfast flavor.

Steel Cut Oats with Koji Starter
After an overnight soak, the oats were ready for the koji without additional cooking. I did a quick 10 minute run in the steamer to make sure I killed off any unwanted beasties prior to mixing in the starter. The oats had a tendency to clump and stick. I did my best throughout the process to keep it fluffed up to make it koji friendly.

Steel Cut Oat Koji
The oats came out much better than I expected. The koji both fermented and sweetened probably due to the clumps creating a varied environment. A perfect breakfast cereal base.

Now go forth and kojify your favorite grains and legumes. Thanks to Branden and @fermup for developing a foolproof process. He was kind enough to put together a blog post that provides detailed instructions from start to finish. It also has a link to the incubator build. 

http://fermup.com/blog/how-to-fall-in-love-with-koji/

Please share your koji adventures with us to keep the ideas bouncing.

Ogiri-Saro, Funky Sesame Paste

I had no idea what ogiri was until @geofflukas mentioned it after tasting a butternut squash seed tahini I made seasons ago. Ogiri is an African alkaline fermented seed paste used for umami. Time passed and I forgot all about it.

Mesquite Smoked Ogiri-Saro (Fermented Sesame Seeds)

Geoff called me a couple weeks ago to help him make lesser known fermented products from around the world. Of course, ogiri was at the top of the list. I did some research and discovered there isn't a whole lot out there on this flavoring agent. I was lucky enough to find a couple of references on Google Books that have pretty good detail on the processes.

Handbook of Indigenous Fermented Foods by Keith Steinkraus
Fermented Grain Legumes, Seeds and Nuts: A Global Perspective, Issue 142

I decided to try the Sierra Leone ogiri-saro first because it has the most readily available ingredient, sesame seeds. I put together a process based on what I read. It's actually very easy to ferment. All you do is boil the seeds, strain and wrap in a banana leaf. Then wait a week for the bacteria to do its work. Keep in mind the banana leaf does a wonderful job containing the ammonia smell. Do not open it up, stick your nose right on top of the seeds and take a whiff like I did. It's an awful smell.

Banana Leaf Wrapped Boiled Sesame Seeds


After the fermentation is done, hot smoke the packets for two hours. I decided on mesquite because I was sure it would stand up to the strong aroma. Another reason for smoking is to get the ogiri hot enough to kill the bacteria. This is followed by pounding into a paste with salt to taste. I figured it should be a little on the salty side to keep it shelf stable.

Finished Ogiri-Saro Paste

Ogiri-saro has a unique flavor that's well worth the effort. It's nutty, funky and has cheese notes. I'm looking forward to playing around with it. I'm also hoping that someone out there can help me source some so I can get a reference taste.


The Needs
  • 8 oz. hulled sesame seeds
  • 2-3 banana leaves depending on size
  • Butcher's/cotton twine
  • Medium size pan
  • Large size pot and towel to cover or ceramic crock with cover
  • Smoker
  • Mesquite chunks or chips
The Process
  • Add sesame seeds to 3 quarts of water in a pan
  • Bring to a boil
  • Simmer covered for 2 hours
  • Strain the sesame seeds to remove most of the water
  • Let the sesame seeds sit in the strainer until you're ready to package
  • Cut eight pieces of banana leaf approximately 12" long
  • Lay out four pieces in a row
  • Stack a second layer on each piece with the leaf fibers rotated 90 degrees
  • Split the sesame into four equal piles at the center of each of the leaf stacks
  • Fold each banana leaf stack around the seeds creating a disk/puck that is completely covered by the leaves
  • Tie the packet with butcher's/cotton twine
  • Stack the packets at the bottom of a stainless steel pot covered with a towel or a ceramic crock with a cover
  • Allow the seeds to ferment for 5-7 days at room temperature
  • Open a packet and check for an ammonia smell
  • Hot smoke the packets for two hours
Important: During the smoking process, monitor the temperature of the seeds to ensure it reaches the temperature to kill off the bacteria that drove the fermentation. I used 180 degrees F to be safe. 
  • Allow the sesame seeds to cool to room temperature
  • Pound the seeds into a paste and add salt to taste
Next up, raw sunflower seed ogiri.

As always, stay inspired and keep the ideas bouncing.